Showing posts with label dining room. Show all posts

Monday, April 4, 2011

The Green Hornet aka My Buffet

I love this buffet. It was a steal but needed some work. I knew right away that I wanted to paint it - Brian fought it. He was leaning more towards a full restoration of the mahogany. Since it didn't look that bad, we just put it in the dining room and used it.  We left it in it's "before" state for years...

Before:

We snagged this for $40.  It was really dark and I REALLY wanted to paint it. This is actually a good picture of it - the veneer was damaged & it was pretty beat up.  I was hoping Brian would change his mind about painting it and he did!!.....


After:
 Yeah..BIG change.  The heavy distressing brought out the details.

It took a lot of sanding to get through that hard finish.
(I don't have man hands, btw. That's Brian sanding)


The top was polished with 2 coats of wax.

 It's a bold look but it really works in this room especially with the curtains. The walls look bright on my monitor but they aren't scary green.


Token busted drawer.

Gorilla glue took care of it.

Dovetailed drawers are a beautiful thing.

      I know this look isn't for everyone but I looooove it.  

Just another view .

Like I said, it really works in my dining room and painting this piece means that the whole room is FINALLY finished!!  Now, I'm making some pillows and painting furniture like crazy (we're supposed to have a storm move in tonight and I gotta move quick).  Hope you all had a good Monday!

Talk to you soon -


I'm linking to Thrifty Decor Chick's Before & After & all the parties in my side bar.  Check them out and see a ton of other cool projects!!


Tip Junkie handmade projects

Saturday, January 29, 2011

Dining Room & A Feature!

I want to thank Maryann from Domestically Speaking for spotlighting the mirror I painted last week at her Power of Paint Party -THANK YOU!!!  I've followed her blog for a while now and love her philosophy towards life & decorating!  I love link parties - the creativity shown by everyone is truly inspiring and I appreciate all of the gracious ladies who host them!

Ok, now let me ask you this...how confused does your husband stay?  I keep mine pretty confused and guessing when it comes to my musical furniture shenanigans..here's the latest.

I bought this Ethan Allen dining set a couple of years ago from a consignment store. It's a well made maple set and it was a steal. I knew it was going to need some work but rarely do I buy anything that isn't a project. 

The first thing I did was paint the chairs black.  Let me just say that painting these chairs was a royal pain! There are so many details about them with the spindles, curves..gotta get every angle covered..it took me about a week to get them finished working around my job, weather & the fam.

It looked better but I still had some work to do. 
(This looks so yucky to me now..but it was a start)

 Next the table top....

  I sanded the tabletop down to reveal GORGEOUS wood and sealed it with tung oil. 

Then I pulled some things out of the room, so it wouldn't feel so busy and Brian hung the chandelier. But it just didn't look right to me (this is where the husband confusion comes in because when I told him the chairs just didn't look right, I got a resounding "WHAT!?!" back). Well, you gotta do what ya gotta do, so I 'sat on it' for a while and waited...patience grasshopper..THENNN

I found THESE at Goodwill:

Nice details & very simple.

I love this mid-century look - clean lines & just a smidge wide..perfect!  So while I loved the shape, I did not love the fabric and they needed a paint touch-up.

Presto-Change-O


(I think I have a crush on this fabric...)


I recovered them in a woven houndstooth and added a fresh coat of paint. (like my chair model?)

Here's the dining room now:

I'm super happy with the change!
These white chairs & the chairs that I slipcovered a while back are just the look I was after.

The only thing left in the dining room is to restore our mahogany buffet...and then I'll be ready to repaint the whole room, I'm sure.  And just in case all the husbands haven't figured it out yet, we'll never be finished!

I'm linking to SNS @ Funky Junk & Under The Table and Dreaming.


I'm going junking now - have a good Saturday!

Wednesday, December 8, 2010

Chandelier is UP!

My dreams came true!  Brian tackled removing our old light fixture & put up the new one this past weekend.  I was thanking him the whole time because as you can imagine, crawling around in the attic is no treat!

Mom picked this chandelier up for me last year for $20 at Lowe's.  They have the best clearance!  I liked the shape but it was a little too fussy, so I simplified the design a little.


I painted it black at first but it looked too flat, so I repainted it with Oil Rubbed Bronze. ORB gave it a nice sheen & some dimension.

This is what it originally looked like.  I used pliers to remove the leaves & sanded down any rough places left behind.  I still have the crystals & will use them in another project, I'm sure.


I love the dripping wax look on socket sleeves but couldn't find any, so I made my own.  I used hot glue and dripped it down the plain white plastic ones, then painted them a soft white.


(Aww man, the guy on the left is leaning a little. Didn't notice it until picture time, of course!)

We're installing a dimmer switch for it this week. I am seriously going to do that myself.  I'm ready to move up from rewiring lamps.  If you don't hear from me again, then you'll know I forgot to turn off the circuit breaker! 

I'm linky partying with Frugalicious Friday at Finding Fabulous!

I hope you all are having a good week and staying warm.  And as my niece says,

"Lemon out!" (we love 30 Rock)


Wednesday, December 1, 2010

My first slipcover!

I've a hard time keeping up with blogging lately.  I have several projects like an inch away from being finished and I'm in a mad dash to get them done before Christmas.  And I haven't EVEN pulled out one single Christmas decoration yet - that kinda makes me queasy just thinking about that.  I know some people love holiday decorating (my niece being one of them...if she could make outside Christmas decorating a competitive sport - she would AND she would win!)  Don't get me wrong, I love a Christmasy feeling all over the house, but just the idea of hauling tubs from the garage, switching everything out & wrecking the house in the process, then having to put it all back up...blech!  I guess that's a little Scroogey of me, huh?

Well, all that aside, I did make my first slipcovers for 2 dining room chairs.  I bought these chairs for $5 each.  They are super sturdy and just what I was looking for to do this project.  I wanted to mix things up a little at the dining room table because it seemed too matchy-matchy with all the chairs being the same.

Before:

I would have just painted them & recovered the seat but there was some minor damage to the caning.


Added a layer of batting.


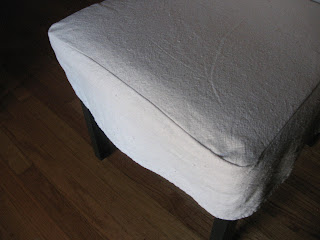
Pin fit a lightly bleached drop cloth.  Covering the second chair went a lot faster than the first.  I took advantage of the already hemmed drop cloth when I could (as MMS advises). I pinned just a smidge snug then sewed on the outside of the pin line. 


After:

They're very simple but I like them.  I'll try cording the next time.

 
I painted the legs black.  I know I should have ironed it before taking pictures,
but at the time that seemed really, really hard.


I also played around with my centerpiece and added some berries & more candles.

 We still have the chandelier sitting in the corner, so that sucker needs to go up and the 1980s one (seen in the mirror) can come down.  I might be able to talk Brian into doing that this weekend.

Last night I made the curtains for Andy's closet and hung them.  I'm finishing his window valances  today. I love the way his room is coming together.  I'm going to put pics of that up this week.  And I'm pretty sure I'm doing some long term damage to my hands with my non-stop crafting. We suffer for our art, don't we?

I'm linky partying with MMS at FFF.  Thanks for coming by!

TTFN,

Wednesday, September 22, 2010

Mirrors...need I say more?

I messed around with the dining room this past week after my mom unearthed this HUGE mirror when she was redecorating one of her rooms.  She thought I might like it..that's an understatement. It's fabulous..the bigger the better...

Before:

This was the old mirror that is quite a bit smaller. It's finding a new home in my son's room after I try something new on it.  If it bombs, this mirror will never be seen again.
 
After:

Mirrors really open up a space.  My dining room can look like a bowling alley if I'm not careful and this larger addition adds depth.   

 That's all I'm up to..one fun thing I have on my little agenda today is to pick out hardware for the redesigned bookcase. I love how paint can change the entire feel of a room or piece of furniture.  Don't you wish life were that easy?  I think everyone would keep a can of paint on them!


Talk to you all soon,

Friday, May 21, 2010

Garden Sheds & Table Redo!

I'm back! I've been out of pocket the last few weeks...between my job, family & the gym I've been one busy bee!

I need to get outside and get my back garden in shape..it's a total jungle out there. We have fruit trees (apple, pear & mulberry) with some great foundation plants but it all needs some TLC. I have 3 outbuildings that have TONS of potential. They need a little elbow grease and some imagination to transform them into charming and I think I'm up for the challenge. Here are a few ideas I have for them from HGTV.com. ADORABLE!

Ok, so here is the table that I finished yesterday...


Before
I found this for an outstanding price at HFH. I've seen them sell for upwards of $120 & I got this one for $35. It was wobbly but some Titebond wood glue took care of that.

I did the usual..used Silky White from Behr then lightly sanded and aged with dark oak stain.


After
I'm happy with how it turned out. I like being able to store all of the dinner dishes and some glassware on the shelf. I'm a lamp fanatic so they are everywhere..I found a glass lamp that I'm thinking about putting here but until I rewire it, this will do just fine.


I played around with flowers & greenery for the vase and made the balls in the glass dish out of fabric strips. I collect old tins because they are great for adding height to a display & layering.

I like how the stain is uneven in some places on these turned legs. I think it makes the aging look a smidge more authentic.


So do what the scabble tiles say & have a good day!!!

I'm linking to Flaunt it Friday at Chic on a Shoestring Decorating & Metamorphosis Monday at Between Naps on the Porch.


Friday, February 26, 2010

Wine Storage Cubbyholes

I'm very excited that this is finished!  Remember what these looked like when I brought them home?

Before:


After:

It was a daunting process - they were filthy. I had to remove the funky name tags, tape residue & gunk, in general. After sanding, I painted them with Black Suede from Behr (recommended by Thrifty Decor Chick), BLT made a backing from plywood and voila - we now have wine storage!


I guess we need to get more wine.


That's a fat little bird hide-a-key in there.


We have a little alcove in our dining room perfect for the wine cubby.


. Wine corks are the perfect size for the little compartments in the typeset drawer.


Mom brought this budding camellia for my little vase.
(My plant isn't doing as well as her's)

The downs of my project:


This is my best friend and my nemesis.


BLT cut the board and I attached it..my 'eyeballing' technique didn't work out so well as I had a few of these..


these are the patched up holes where I shot the staples through the plywood..way to go!


My parting shot - I couldn't find any gloves and used a grocery bag. (This is probably very familiar to you guys.)

I'm including this in:
Miss Mustard Seed's Furniture Feature at Miss Mustard Seed's Creative Blog
Frugalicious Friday at Finding Fabulous
Metamorphosis Monday at Between Naps On The Porch
Make It For Monday at Cottage Instincts
Before & After Party at Thrifty Decor Chick

Related Posts Plugin for WordPress, Blogger...